Tuesday, June 24, 2014
Black Trim


Friday, June 20, 2014
Friday Favorites
Here's hoping your weekend is as restful as this space….

( I would love to credit the right person, so if you know who deserves credit for this photo please tell!)
and here are some links that have been catching my eye this week:
Summer hair inspirationThis Austin studio
The cutest stapler
We used this tutorial to make Reese's $35 teepee
Braiding tips (can you tell I have summer hair on the brain?)
I seriously love every one of these throws
These were the sandwiches I made for the picnic, and they were delicious
Cute romper
The sweetest baby bed/hammock
This partial wooden wall
Ps. Zara's bi-annual sale started today
Wednesday, June 18, 2014
A Second Birthday
If you follow me on instagram, you'll know Reese turned two over the weekend, and if you know me at all, you know I love any chance to celebrate. It's not only a creative outlet for me, but it honestly brings me so much joy seeing people I care about enjoying themselves. Instead of doing a party, we opted for doing a picnic with her best friend and her family. Originally, I thought it would be a great idea to do a picnic at the Indianapolis zoo gardens followed by a visit to the butterfly house. After a recent zoo visit, it became clear that what would would really make this two your old happy would be to run around with as little boundaries as possible with her best bud. So we ended up having the picnic at the gardens near the Indianapolis Museum of Art (where there was more room for them to run around). I made them butterfly wings, little crowns, handed them butterfly nets, and then we made a teepee (her birthday gift) just in case they got antsy. When planning things like this, you never know what you're going to get…..the weather could be horrible, not to mention the mood of your toddler! I was fully prepared to put a lot of effort into it, but have nothing work out……thankfully it was quite the opposite. The weather was perfect, the girls ran around with their butterfly nets thoroughly enjoying themselves, and the only "glitch" was that the butterfly wings I made for the girls were not a hit. Oh well, if that's the only complaint, I'll call it a success!
~


These two girls have the sweetest friendship, it is the most adorable thing to watch them together and makes my mom heart happy.


Friday, June 13, 2014
Friday Favorites
My little girl turns two today, so I'll be spending my day doing all of her favorite things. The other night after we had put her to bed and were looking at pictures and videos of her (because we miss her when she's sleeping….we are lame like that:), I told Red that just when I don't think I could love her more, I do. It's something that has taken me by surprise, and I feel so incredibly blessed. Happy weekend you guys! And now….for some Friday favorites:
~
The room divider in this room
~
The room divider in this room

This bedroom makeover (make sure to take check out the entire bedroom, it's a beautiful transformation)

and these links:
This vase
Tips to making your denim last
These white Birkenstocks made me a follower (and I'm still shocked that I'm saying that)
This bedding
All of Rifle Paper Co's new wallpapers
This pretty apartment
Wallpaper removing tips
Monday, June 9, 2014
$10 DIY modern "brass" lighting tutorial
As promised, today I'm sharing with you just how I made our dining room lighting. Maybe you've wondered how I bought those brass parts for so cheap? Or maybe you noticed the word brass in quotations and had a sneaking suspicion that they are not brass parts…….if that was your guess then you are correct. As much as I would love it to be real brass, we all know that if it was, the lighting would cost way over ten dollars. So here is my secret ingredient…..STRAWS. Yes, the lighting is actually made of straws. I was pleased that at two different points, friends who came to the house and saw the lighting in the works assumed it was made of brass. I was secretly worried that it would look like straws, but I think I can safely say that I pulled it off.

So really, there are only 4 items you need for this DIY:
-straws (without the bendable portion). I used black and there are bits of black that come through where I missed with the spray paint, and I felt like it helped with the overall "brass metal" look as opposed to being perfectly gold.
-gold spray paint
-string and needle
-a pendant light kit (I used this one, it got horrible reviews but it worked for me.)
*I already had the straws, gold spray paint, and string on hand….then with a coupon the light kit was only $10….win, win.
First, you want to pull the string through three straws in a row. Then cut the string and create a triangle.
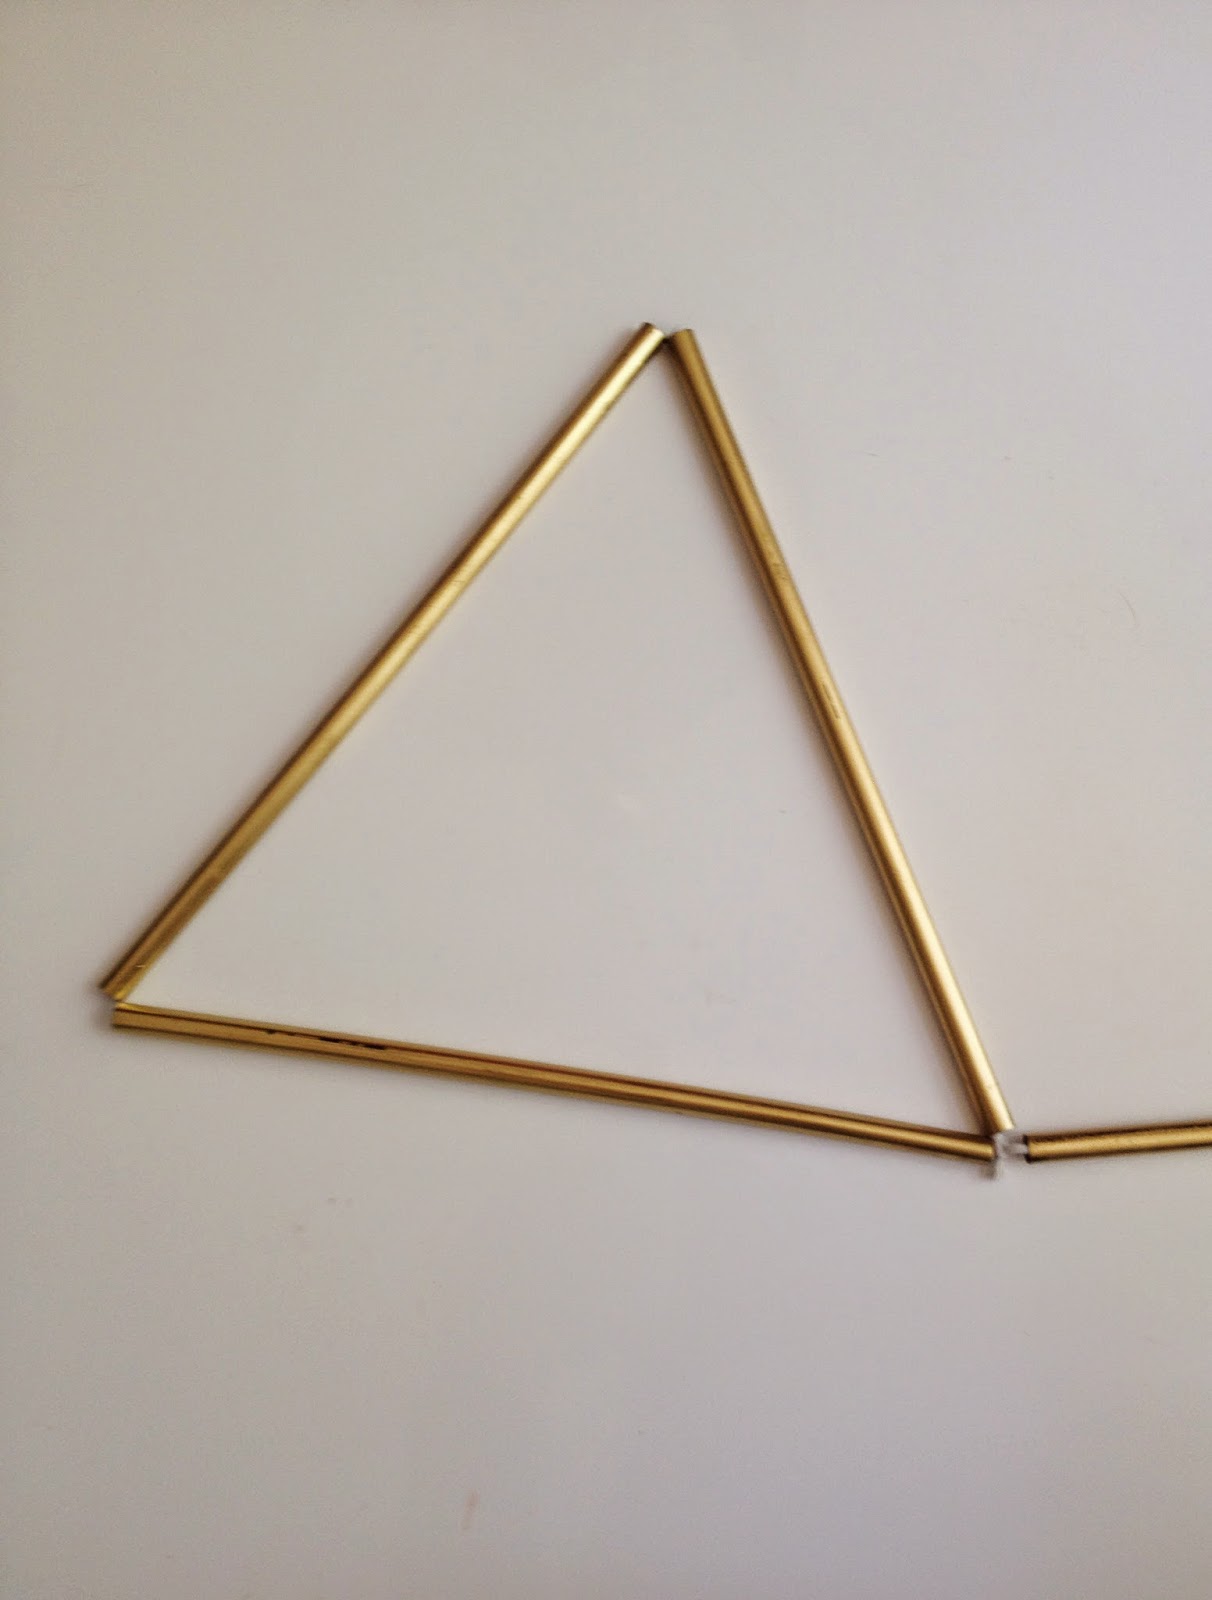
From there, I simply added triangles to create the shape I wanted….usually this was two straws at a time.


After hanging the black pendant light fixture, I hung up the brass sculpture part around it using wire at the top. I found that I was better able to see where more triangles were needed when it was hanging. I was also able to see where I wanted to connect the triangles when it was hanging.

Lastly, trim any string from the knots that you made, and then go back and paint over any exposed knots with gold paint and a paint brush.
Friday, June 6, 2014
DIY Modern "Brass" lighting for $10 and a dining room reveal
By now, this is hardly a reveal. You have caught glimpses of the process of the transformation of our dining room over this past year (here and here), but not the entire room. Well, here it is! I secretly hate "reveals" because the word seems to connotate that the room is exactly the way you want it, finished, or perfect. I don't know if I have ever felt that way about a room. Don't get me wrong, I'm very pleased with the turnout…..I see this room as my very best effort with the budget we agreed upon. The table and bench were DIY thanks to Red, the bar cart and Bentwood chairs were cheap craigslist finds, and the head chairs were our splurge. After the purchase of the head chairs, we agreed that we were done spending money on house things for a while (aside from Christmas and birthday money), so I sort of decided that I had to be content with the ugly standard-new-house-lighting we had from when we first moved into our house. There are worse things. Then one night when I was having trouble sleeping, I made up my mind that I could come up with a cheap alternative that would neither cost us much in terms of money or design….my favorite type of challenge. Here I give you my $10 lighting….I will share the tutorial with you next week.
~
And just for fun, here is a picture of the dining room when we first bought the house (our realtor's picture and previous owner's furniture).

The transformation with the new lighting:


Wednesday, June 4, 2014
Dining Room Lighting
Before I share our dining room lighting with you, I wanted to let you in on the brainstorming process. While my finished lighting is very different from these two pieces, my inspiration started with them. Actually, I first dreamed of a crystal chandelier, but it wasn't long before I realized the space needed brass/gold lighting (so it wouldn't look too farmhousey)….. and that it needed to be DIY(for budget reasons). These two modern ones caught my eye. While both of them are DIY and (as far as lighting is concerned) not expensive, we made the decision to put lighting on the back burner as we spent money on more practical things…..like chairs.
~


Then on a shopping trip with a friend I saw something similar to this pretty mobile in Jcrew's window displays. That's when the wheels really started to turn.

I will leave you with that until Friday…….
Monday, June 2, 2014
Life Lately According to My Phone
If you follow me on instagram, most of these are repeats. If not, here is what I've been up to the past couple weeks:
1. A DIY coming to you soon….

2. A new find, and the prettiest lunch place

3. A package from a friend that knows me well

4. Exploring new sites with my little one


5. A pretty lunch view

6. More local exploring with this cutie

Subscribe to:
Posts
(Atom)